相关代码:DPDK_Learning/UDP_recv at main · mfdycs/DPDK_Learning (github.com)
思路步骤
1. 进程初始化
固定方法,用于初始化DPDK,检测巨页、CPU是否有设置
if (rte_eal_init(argc, argv) < 0) {
    rte_exit(EXIT_FAILURE, "Error with EAL init\n");
}
2. 初始化内存池
一个进程确定一个内存池, 用于接收数据
struct rte_mempool* rte_pktmbuf_pool_create(const char* name,
                                            unsigned n,
                                            unsigned cache_size,
                                            uint16_t priv_size,
                                            uint16_t data_room_size,
                                            int      socket_id);
参数:
- name: The name of the mbuf pool.
- n: The number of elements in the mbuf pool. The optimum size (in terms of memory usage) for a mempool is when n is a power of two minus one: n = (2^q - 1).
- cache_size: Size of the per-core object cache. See
rte_mempool_create()for details. - priv_size: Size of application private are between the
rte_mbufstructure and the data buffer. This value must be aligned toRTE_MBUF_PRIV_ALIGN. - data_room_size: Size of data buffer in each mbuf, including
RTE_PKTMBUF_HEADROOM. - socket_id: The socket identifier where the memory should be allocated. The value can be
SOCKET_ID_ANYif there is noNUMAconstraint for the reserved zone.
为了提升性能,我们不设置整4k,而是 4k-1,这样大块可以放在另外的地方
#define NUM_MBUFS (4096-1)struct rte_mempool *mbuf_pool = rte_pktmbuf_pool_create("mbuf pool", NUM_BUFS, 0, 0, RTE_MBUF_DEFAULT_BUF_SIZE, rte_socket_id());
if (mbuf_pool == NULL) {
rte_exit(EXIT_FAILURE, "Could not create mbuf pool\n");
}3. 初始化网卡
确定传送/接收数据的网卡
在安装DPDK的时候,我们会先绑定相应的网卡,可以选择相对应的功能查看绑定信息
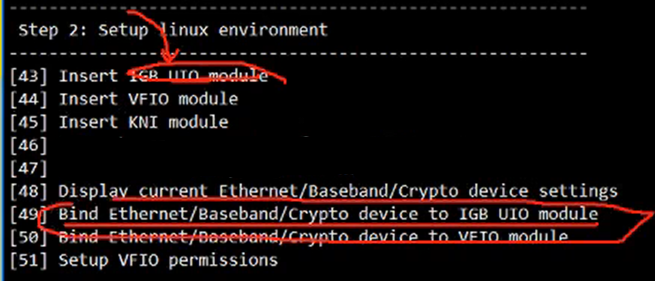
43-45插入,选择49-50可以绑定,48查看信息
Option: 43
Option: 44
Option: 45

Option: 48
最前面的为PCI地址

选择49,输入 0000:03:00.0 绑定 VMXNET3 多队列网卡
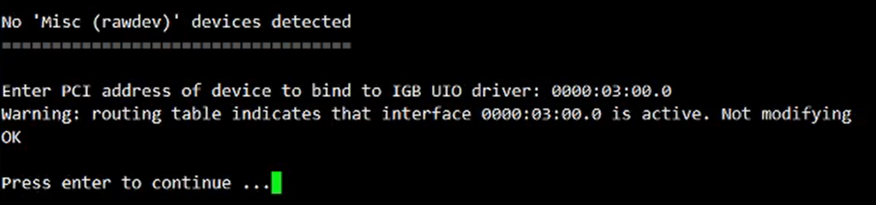
此时可能会提示该设备被占用,在使用前需要先 down 掉
ens 为虚拟网卡, 需要先改为 ethx
初始化网卡
#define NUM_BUFS (4096-1)

int DPDK_PortID = 0;

static const struct rte_eth_conf port_conf_default = {
    .rxmode = {
        .max_rx_pkt_len = RTE_ETHER_MAX_LEN,
    },
};

static void ng_init_port(struct rte_mempool *mbuf_pool) {
    uint16_t nb_sys_ports = rte_eth_dev_count_avail();
    if (nb_sys_ports == 0) {
        rte_exit(EXIT_FAILURE, "No Supported eth found\n");
    }

#if 0
    struct rte_eth_dev_info dev_info;
    rte_eth_dev_info_get(DPDK_PortID, &dev_info);
# endif

    // 配置网卡信息
    const int num_rx_queues = 1;
    const int num_tx_queues = 0;
    struct rte_eth_conf port_conf = port_conf_default;

    int ret = rte_eth_dev_configure(DPDK_PortID, num_rx_queues, num_tx_queues, &port_conf);
    if (ret < 0) {
        rte_exit(EXIT_FAILURE, ":: Cannot configure device: err = %d\n", ret);
    }

    ret = rte_eth_rx_queue_setup(DPDK_PortID, 0, 128, rte_eth_dev_socket_id(DPDK_PortID), NULL, mbuf_pool) < 0);
    if (ret < 0) {
        rte_exit(EXIT_FAILURE, "Could not setup RX queue\n");
    }

    ret = rte_eth_dev_start(DPDK_PortID);
    if (ret < 0) {
        rte_exit(EXIT_FAILURE, "Could not start\n");
    }
}
其中,启动队列的函数为
int rte_eth_rx_queue_setup(port_id, rx_queue_id, nb_rx_desc, socket_id, rx_conf, mb_pool);nb_rx_desc 为当前指定队列的最长长度,为 rte_eth_rx_burst() 接收的包数量,超过且未设置处理的话会导致内存泄漏
4. 接收数据
接收数据,首先考虑以下几个问题:
- 从哪个端口接收
- 从哪个队列接收
- 接收完放到哪里
- 长度限制是多少
#define BURST_SIZE 128

struct rte_mbuf *mbufs[BURST_SIZE];

unsigned num_recvd = rte_eth_rx_burst(DPDK_PortID, 0, mbufs, BURST_SIZE);
if (num_recvd > BURST_SIZE) {
    rte_exit(EXIT_FAILURE, "Error receiving from eth\n");
}
5. 处理数据
unsigned int i = 0;
for (i = 0; i < num_recvd; i++) {
// 处理 mbuf 中的数据
struct rte_ether_hdr *ethr = rte_pktmbuf_mtod(mbufs[i], struct rte_ether_hdr*);
if (ethr->ether_type != rte_cpu_to_be_16(RTE_ETHER_TYPE_IPV4)) {
continue;
}
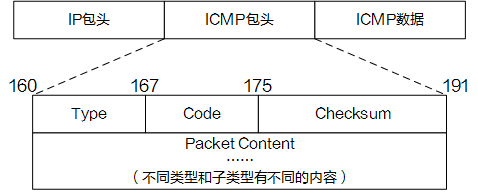
struct rte_ipv4_hdr *iphdr = rte_pktmbuf_mtod_offset(mbufs[i], struct rte_ipv4_hdr*, sizeof(struct rte_ether_hdr));
// UDP协议数据
if (iphdr->next_proto_id == IPPROTO_UDP) {
struct rte_udp_hdr *udphdr = (struct rte_udp_hdr*)(iphdr + 1);
uint16_t length = ntohs(udphdr->dgram_len);
*(char*)(udphdr + length) = '\0';
struct in_addr addr;
addr.s_addr = iphdr->src_addr;
printf("src: %s:%d, ", inet_ntoa(addr), ntohs(udphdr->src_port));
addr.s_addr = iphdr->dst_addr;
printf("dst: %s:%d, len: %d --> %s\n", inet_ntoa(addr), ntohs(udphdr->dst_port), length, (char*)(udphdr + 1));
rte_pktmbuf_free(mbufs[i]);
}
}运行代码
- 初始化环境变量
export RTE_SDK=/home/king/share/dpdk/dpdk-stable-19.08.2/
export RTE_TARGET=x86_64-native-linux-gcc- 将代码放到
./example/recv目录下,拷贝其他例子的 makefile,修改编译文件,编译
# binary name
APP = dpdk_recv

# all source are stored in SRCS-y
SRCS-y := recv.c
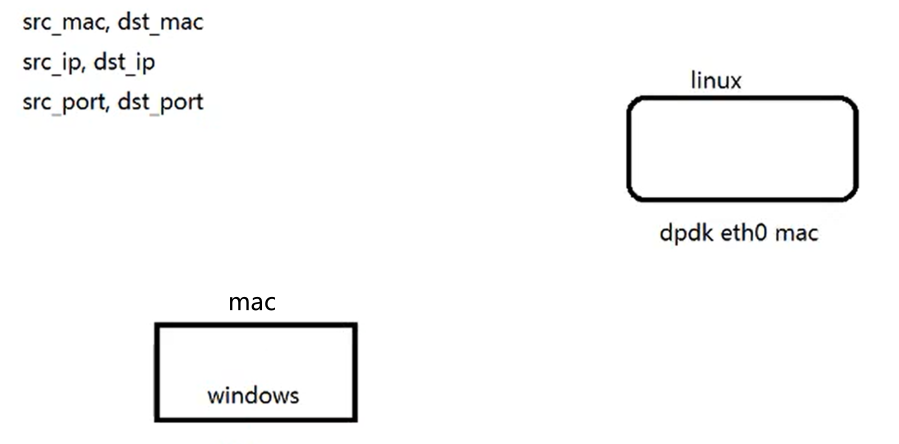
- 从系统中解绑网卡,这里解绑 eth0:
ifconfig eth0 down- 绑定网卡
发送端添加ip和网卡绑定: arp -s ip mac
绑定对应网卡的arp:
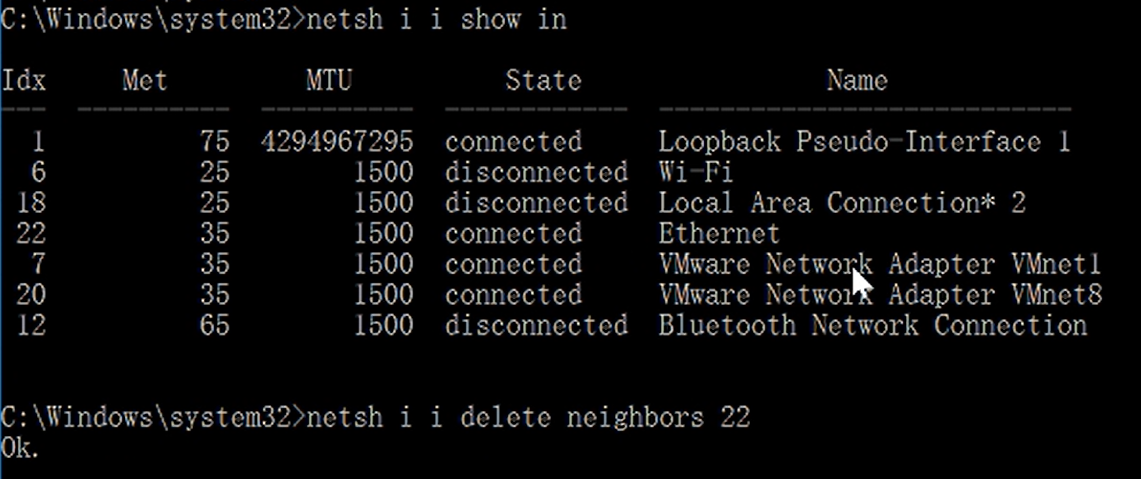
# 查看网卡
> netsh i i show in
Idx     Met         MTU          状态                名称
---  ----------  ----------  ------------  ---------------------------
  1          75  4294967295  connected     Loopback Pseudo-Interface 1
  6          25        1500  disconnected  WLAN
 23          25        1500  connected     以太网
 26          25        1500  disconnected  本地连接* 1
 12          25        1500  disconnected  本地连接* 2
  9          65        1500  disconnected  蓝牙网络连接 2
 17          55        1400  disconnected  以太网 2
  4          35        1500  connected     VMware Network Adapter VMnet1
 13          35        1500  connected     VMware Network Adapter VMnet8
 52        5000        1500  connected     vEthernet (WSL)

> netsh -c i i add neighbors [Idx] [IP] [MAC]- 运行
./build/dpdk-recv